Video-recording your Android screen might sound like an easy task, but it is actually quite to do, without the proper know-how. Unlike Windows, Android doesn’t really makes it easier for the developers to just create a feature-rich android screen recording app.
Screen recording apps available on the Google Play Store mostly require you to root your phone, and most of them are paid apps. Even if you do find a free app, it may still require root access and will be very limited when it comes to features.
However, the Android software development kit (SDK) does comes with built-in Screen recording feature. It requires you to install the Android SDK on your computer and go through complex procedures to record the screen.
In this tutorial, we are going to just that, but we will use a dedicated script instead of whole developer tools and complex processes. The script is basically the same thing, but it contains only the files that are required to record an android screen. This makes the whole process extremely light and simple .
Enable USB Debugging
Before you download the script and start recording, you first need to enable “USB debugging” in your android phone. USB debugging will let you connect your Device to a PC and receive commands from Android SDK. You need to enable “USB debugging” from the “Developer options”, which comes with all the Android phones but it is hidden.
Note: Developer options are made for the use of Developers and if these options are changed without proper knowledge, they may affect the phone negatively. Furthermore, once enabled these options cannot be disabled unless the phone is factory reset.
To enable “Developer options” (if it is not already enabled), you need to go to the “Settings” and tap on “About Phone/Device” located at the end. From there, scroll down to the end and tap on “Build number/version” 7 times rapidly. You should see a message confirming that the developer options are now enabled.

Now, go back to “Settings” again and you should see “Developer options” located at the end. tap on it to access it and check the checkbox next to the option “USB Debugging” and confirm the prompt to enable USB Debugging”.

Record Android Screen
Download the Script on your PC, it is a Zip file so you will have to extract it using a compression tool, such as 7-Zip. The extracted folder should have all the files like showed in the screenshot below.

Now, connect your phone with your PC using a USB cable and once connected, you will see prompt after a short delay (it may take some time) asking permission to connect to your PC. Just tick the checkbox (if you want to always allow the specific computer to connect) and tap on “OK”. Your phone will be connected and ready to receive commands.

Go to the Script folder and in there double-click on “AndroidRecordScreen.bat” file to open it.

Now to record your android screen, all you have to do is press any key on your keyboard and it will start recording. So make sure you are on the screen which you would like to actually record.
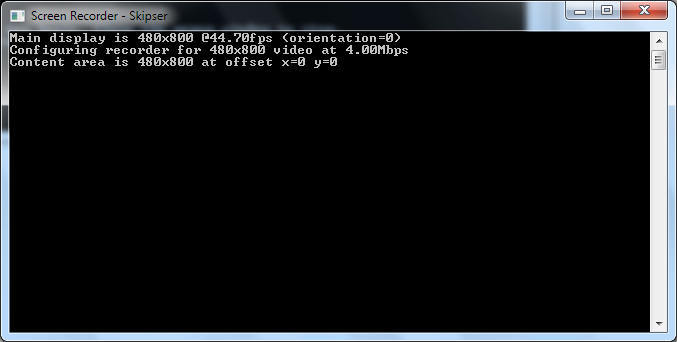
Press any key on your keyboard and another window will open up confirming your android screen is now being recorded. To stop the recorded all you have to do is close the “New” window that opened up and the recording will be stopped.

Note: Although the recording is very smooth, but it is only limited to 3 minutes and there will be no audio. You will have to record audio separately (you can use your phone’s recording app) and if you need a longer video, you will have to join multiple videos together using a dedicated tool such as Freemake.
Once you will close the “New” window the old window that opened up at the start will save the video in the same folder on your PC and also on your Phone, which you can access in phone gallery. This also means that you should not close the first window when the second window opens up, as your video will not be saved.


Adjust Settings
You can also adjust settings of the Video, but the options will be quite limited. To adjust the settings, open “AndroidRecordScreen_advanced.bat” and press the “n” key on your keyboard and hit enter.

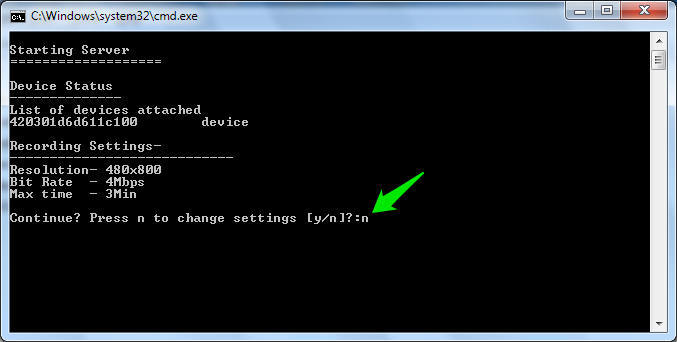
You can change three different options, Resolution, Bitrate and Max video time (it cannot exceed 3 min). Just provide new values which you would like to use and hit enter. The option to start the video will show up, just press any key on your keyboard again to start the video and it will use the new settings to record.


The new settings will only be applied to a single video, when you will close the window the settings will be set to default.
Other Methods to Record Android Screen
Yes, the above mentioned method is a bit limited and requires you to connect your phone to a PC, but it is completely free to use and can be quite handy in many situations. However, if you are still not satisfied or you have bigger plans, then you will have to go for Android apps and they all come with a catch.
You may have to root your phone and also pay for the app if you would like to use all the features without any limits (free versions are very limited). Here are some Android screen recording apps that you should consider if you would like to go down that road.
If you have any questions or would like to add any further information, let us know in the comments below.
Filed in . Read more about Android, Record, Screen and Video.