The DNS (Domain Name System) is a directory of records for the Internet (just like a phonebook directory). A DNS server associates a domain name such as www.ubergizmo.com with an IP address, because names are much easier than numbers for users to remember. When DNS servers aren’t accessible, you can no longer access your favorite sites.
If you encounter the error “DNS server is not responding”, chances are that the default DNS server of your ISP might be temporarily down, might be misconfigured in your settings or perhaps has moved to a new server. Fret not, whatever be the root cause of the error encountered, we will list out several solutions to fix the “DNS server is not responding” error, with Windows 10.
Before trying any of the solutions below, you may want to simply shutdown your computer, modem+router, then restart them all and try connecting.
1. Manually Set A DNS Server (Recommended)
It is very likely that your ISP’s DNS server has encountered downtime (maybe temporarily). So, you will need to use another DNS server to continue accessing the web. There are several DNS providers and you can use any of them (as per your preference). However, I would personally recommend you to try Cloudflare’s 1.1.1.1 DNS.
In case you have already set a custom DNS server, you should consider looking for alternatives like Google Public DNS and Cisco OpenDNS. If you are not sure how to manually change it, you can refer our guide on how to change DNS server on your Windows machine or your router. Fret not, even if this solution does not help resolve your issue, it still a good practice to use a different DNS like Cloudflare’s DNS to ensure maximum privacy and speed.
2. Uninstall/Re-install Network Drivers
A lot of users found that uninstalling the network driver (and then re-installing it) resolved the issue. So, if you want to fix “DNS server is not responding” error on your Windows 10 system, follow the steps below:
- Search for “Device Manager” as shown in the image below.

- Click on it to launch the device manager. Once you do that, scroll down to expand the “Network Adapters” as shown below.

- Right-click on your active network connection and uninstall the driver.
- Finally, right-click on any other adapter option and click on “Scan for hardware changes“. The driver should just re-appear. If not, then disconnect your WiFi adapter/cable connection and re-connect.


3. Set Your MAC Address Manually
If the first two solutions did not work, and you are still getting the error – “DNS server is not responding“, then setting your MAC Address manually should do the trick. This address is supposed to uniquely identify a piece of network equipment and is also called “physical address”.
And, to configure your MAC Address manually, you need to first note down your physical address (or MAC address). You will need to take the help of our guide to find your MAC Address in Windows 10.
Once you know what your physical address (MAC Address) is, you need to ensure that your network connection uses the same value. To do that, you need to go through our resource on how to change your MAC Address (in this case, you want to ensure that you have the correct value set). If you want, you can completely try changing your MAC Address and then let us know if it helped to fix the “DNS Server is not responding” error.
4. Clear the DNS Cache
To clear/flush the DNS cache, follow the steps below:
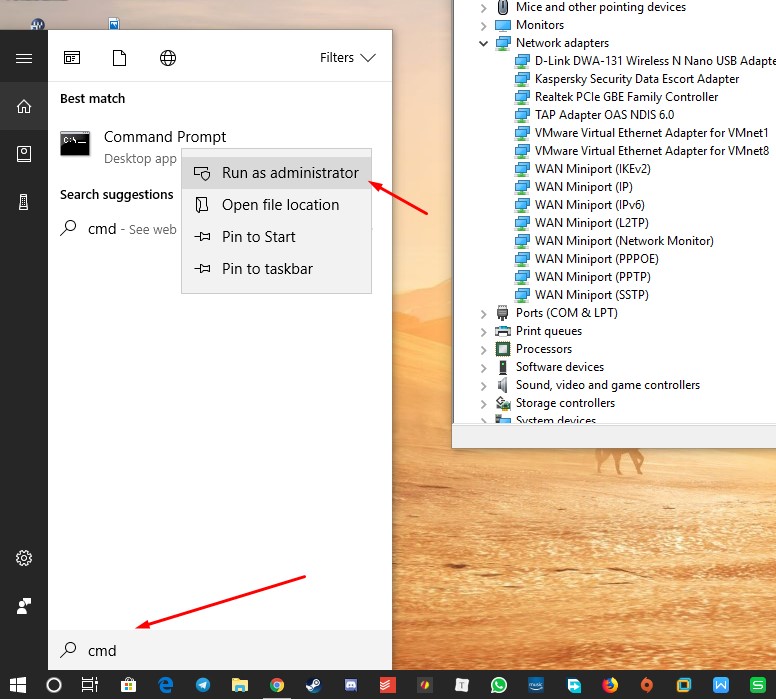
- Launch the command prompt as an administrator (as shown in the image below).
- Type in the following commands one by one (as shown in the image below):
ipconfig /flushdns

ipconfig /registerdns

ipconfig /release

ipconfig /renew
- You have successfully cleared the DNS Cache. Now, check if the error has been resolved.

5. Update Your Network Drivers

You need to head to the device manager window and then scroll down to the section of network adapters. You just need to right-click on the active network adapter and click on “Update Driver“.
If there’s an update available, you should apply it.
6. Upgrade To The Latest Firmware On Your Router
Note: Upgrade failure might cause permanent damage to the router.
It is always recommended to have the latest firmware or software updates applied. So, if it’s an issue with the firmware, you should no longer encounter – “DNS Server not responding” error after applying the update. However, if you are not sure about this, we would not recommend you to proceed. You need an IT expert to upgrade your router’s firmware without failure or confusion. In case you want to experiment, you should refer the router’s manual or the official web resources to know more about the upgrade (the update procedure can be different for several manufacturers).
7. Turn Off Microsoft Virtual WiFi Miniport Adapter
In the device manager window, under the “Network Adapters” section, you might find “Microsoft Virtual WiFi Miniport” adapter listed. You may or may not have it listed. But, if you have it – simply right-click on it and disable the adapter. This should solve “DNS server is not responding” error.
Wrapping Up
Now that you’ve known about the best possible solutions to fix “DNS Server is not responding” error, we are certain that your problem must have been resolved. If it still does not work, let us know about it in the comments below!
Filed in . Read more about Internet.