It happened to me today: I created a Virtualbox (free) Virtual Machine (VM) to run some tests (moving an old PC to a VM), and I have underestimated the disk size that I really needed: with 15GB, the OS (Windows 7) didn’t even have enough space to update itself. No biggie, I can re-size the disk in a click right? Not really.
(Unlike VMWare) There is no graphical user interface to change that particular setting. But fret not, here’s how to do it quickly with the command line for both Windows and Mac. First, make a backup copy of your VM!
Technical details
- The “new graphical user interface section was added using VirtualBox 6 (May 2020)
- This was written using VirtualBox 4.3.22 on Windows and 4.3.20 on Mac (Feb 2015)
- The virtual machine has a dynamically allocated disk (which means that the .VDI file will grow over time)
- The VM OS is Windows 7
New graphical user interface to resize
In more recent version of VirtualBox, you have a Virtual Media Manager that cab resize the disk for you (I spotted it in V6.x but I’m unsure as for when it was added). It is very simple as you just go to the File menu and select it.

Then choose the disk you want to modify, and pick a new size following by “Apply”. But that’s not over! This new graphical user interface basically lets you skip Step 1 to Step 4 in the instructions below.
It is equivalent to increasing the size of a physical disk, but you still need to extend the Operating System partition, as described in Step 5 onwards.
Windows
 Step 1
Open a command prompt by clicking on its icon or typing “cmd” in Start>Search.

Step 2
Go where VirtualBox is installed (typically C:\Program Files\Oracle\VirtualBox) to find the VboxManage utility (full documentation here). Here are the commands to type (one per line):
cd\
cd “Program Files\Oracle\VirtualBox”
You should now be in the proper directory, and can even verify that the VBoxManage.exe app is there by typing
dir VboxManage.exe

Step 3
Find the file path where your virtual machine disk file (.vdi) is (usually in C:\Users\<username>\VirtualBox VMs\).

Step 4
Use the modifyhd command of VBoxManage (a utility that comes with VirtualBox) as follows:
VBoxManage modifyhd “C:\Users\<username>\VirtualBox VMs\<vm_name>\<disk_name>.vdi” –resize <size in MB>
In my case, I typed (to re-size to 40 GB or 40000 MB):
VBoxManage modifyhd “c:\Users\Hubert\VirtualBox VMs\Accounting Clone\Accounting Windows Clone.vdi” –resize 40000
The quotes enclosing is necessary because the file path (and name) has spaces in it, and the Prompt would not be able to handle them without the quotes.
Note: that’s TWO dashes before “resize”. Depending on your font, it may visually appear as one long line.
You should see a visual confirmation that VBoxManage is working on the file. The time to get this done depends on the size, but it should be a matter of minutes. Virtual box will now confirm that the drive is larger (here, it’s 40GB as we asked)

Step 5
Boot into your virtual machine, and you will realize that the drive still appears as being the same size as before (here, 15GB) !!! It’s normal — this is just because although the disk has been re-sized, the partition is still set up with its original size. We can fix it.

Step 6
Go to the disk management by doing Start>Computer (right-click)>Manage>Storage>Disk Management. (you can also open it from the command-line)

Step 7
Right-click on the existing partition you want to extend (here, C:) and choose “Extend Volume” in the pop-up menu.

By default, the Disk Manager will propose that you extend to all the available space, which is what you probably want to do, but you can pick any other size you want. The screenshot below shows that we’re adding 24GB to the existing 15GB => nearly 40GB.

And if all goes well, a new look at the C: drive now shows the 40GB we asked for. There you go. You can finally use the extra space!

Just in case, here’s also a video (not mine) that shows what the process looks like. It uses a slightly different version of Windows, but that should be close enough:
Mac OS X
Step 1
If you use Mac OS, the procedure is almost exactly the same. I’ll make this a little shorter for time’s sake. I know that some users have never used the command prompt (learn more about the OSX prompt), so here’s how to find it: just search for Terminal app.

Step 2
Locate the full path and file name of your virtual machine .VDI virtual disk file. You will need both to enter the command in Terminal.
Step 3
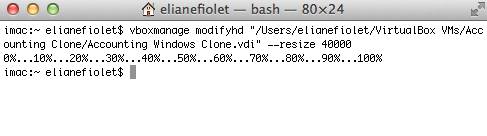
It seems that the VBoxManage app is available from any location by default, so we don’t need to go to the App’s directory. Just the command as follow in the terminal Window:
VBoxManage modifyhd “<vdi_file_full_path_and_name>” –resize 40000
You should see the utility work on the file in the command prompt.
When it is done, restart the VM and boot into Windows. From there, just pick up at the Windows solution, Step 5 as shown above.
You will need to re-size the Windows partition, and you will have enough storage to suit your needs. That’s it!
Misc
Note that I’m assuming that you absolutely need space on the system drive here. I did because I wanted updates to work and I needed to install more apps on C:\.
If you want storage for data, you could also add another D: drive by building a new emulated disk. In general, I find it easier to manage my VMs as single files, but if there’s data sharing, it makes sense to share disks.
If you know a better/easier way of doing this, let us know in the comments. We hope that this saved a few minutes to someone out there!