The purpose of using a Dynamic DNS service is to map your WAN (or Public) IP address to a name. A domain name is easier to remember and it is not affected if your WAN IP address changes, unless you signed up for a business account which offers static public IP address.
Dynamic DNS is a service, mostly free, and there are quite a few of them available. One option would be to just Google for one but I wanted to make sure that the service is supported by my router.

List of Dynamic DNS providers supported by my router.
I have a paid account with NoIP.com, DynDNS was a popular choice until they quit offering their free service early April 2014. I randomly settled with “ChangeIP.com”.
Steps Overview:
1- Verify the current WAN IP address
2- Sign up with a provider to secure a (or several) domain name(s)
3- Decide on the process to update the IP, via a client software or router feature.
4- Testing
1- Current WAN IP address
Your WAN (Wide Area Network), also called public IP is assigned via DHCP by your ISP. It may or may not change. I have noticed that if I swapped routers the WAN IP would change. I guess because the router MAC address changed.
The WAN IP address can be lookup from the router interface or simply Goggle it “what is my ip”.

The WAN IP address is available from the router.

Last resort, ask Google!
2- Sign up with ChangeIP.com
Head over to “changeip.com” and “SIGN UP!”
Fill out the form and “Click to Continue >>”
 Select “SERVICES” (#1) then “Free Dynamic DNS” (#2).

Create your domain name.
Come up with a value for the third level name (#1)
Browse through the available domain name list and pick one (#2)
Add Domain to complete the setup (#3)
For this “how-to”, I came up with “go” for my 3rd level name, “onmypc.net” as the domain name. That made up my name resolution as “go.onmypc.net”. Since the domain must be unique, your choice may or may not be available.

Come up with a domain name that is easy to remember for you.
To check the new setup, find the “Quick Navigation”(#1) and “DNS Manager”(#2)

Click on your domain name (#1) to display the name to IP mapping.

The mapping looks good. The IP matches the values we got from Google and the router status page.

This completes the name to IP resolution process.
3- IP updater
The next step is to decide how the public interface IP address is going to get updated when it changes.
Update via a client software.
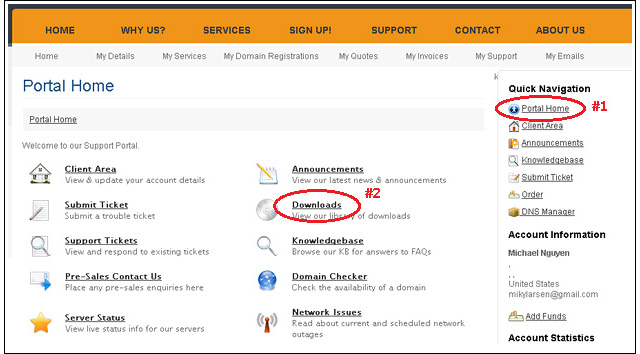
ChangeIP.com has a client updater available for download. Back to the “Portal Home” (#1) and click on “Downloads” (#2)
“Homing Beacon” (#1) is the Windows version. There is a bash script for Linux users. Proceed to download the “Homing Beacon” file.
![]()
Run and Install the “Homing Beacon”. It requires .NET 4.0. If .NET is not present, it will be installed via the “Homing Beacon” installer.
![]()
![]()
![]()
Account settings:
Enter your ChangeIP.com username (#1) and password (#2).
Type in your reserved domain name (#3), set the frequency, from 5 to 30 mins (#4) and “Save” (#5).
![]()
The domain name I picked, now resolved to my WAN IP.
![]()
Update via the router.
Log in your admin GUI router page. Look for the DDNS settings. On my router, it is from “Setup” (#1) then DDNS (#2). The feature is enabled (#3), I selected ChangeIP.com as my “DDNS type” (#4), filled out ChangeIP.com username (#5), password (#6) and hostname (#7). The process was completed the update (#8).
Best practice: If your router supports the DDNS feature, go for it.
4- Testing.
“Start” > “Run” > “Cmd” to bring up the command line.
We could use the command “ping”, such as “ping go.onmypc.net” and it should return a WAN IP. However the right utility is NSLOOKUP as NameServerLOOKUP.
The syntax is just like the ping command, NSLOOKUP [SPACE] domain name.
The name should resolve to the host computer WAN IP address as it did in the screenshot below.

Success! The domain name resolves to my public IP address.
This last output completes the “How To setup a Dynamic DNS” tutorial.
Best Practices:
I would chose to set up the updater on the router, rather than installing a client application. Software wise,I try to only install what I really need.
Since there are other free Dynamic DNS providers, I would set up another account and have a failover, in case one happens to be offline for whatever reasons. You could either install two clients updater or set one up on the router and the software for the other on a PC within your network.
If you find the service useful, consider getting a paid account. The cost is a few dollars per year.
Conclusion
Knowing your how to connect to your network by a name is the first step to host various services on your home PCs and access those services from a remote computer with an internet connection.
To make use of Dynamic DNS requires knowledge of “How To setup port forwarding” rules. That technique allows Internet traffic to be forwarded to your workstations and/or servers hosting some kind of services on your local network.
Filed in . Read more about Networking.