It is quite common practice to upload all your important data on Email services in order to use them when required. This is quite handy, you can easily access the information and you will not have to worry about protecting a physical storage device. However, it seems we are forgetting that mistakes and accidents happen all the time, even if it is a Cloud service.
If you are depending on email services such as Gmail for all your important emails and data, then it is time to reconsider. You never know when your account may get terminated, glitched or hacked!
The best way to protect your data is to back it up and store it somewhere safe for future use. If you are a Gmail user, then it is actually quite simple to backup all your emails and even emails in the trash and spam.
This can be also handy, if you want to move to another account or email service and take all your data with you. In this tutorial, we are going to show you how you can backup all your Gmail data and then restore it.
Method #1: Use Google Takeout Service to Backup Gmail Data
The easiest way to backup your Gmail data without involving Third-party services is to use the Google Takeout service for Gmail. It will create an archive of all your data and will let you download it in a .Zip format.
To backup data, Sign in to Gmail (Any Google Service may work) and click on your Account Picture. From the Pop up, click on “My Account”.


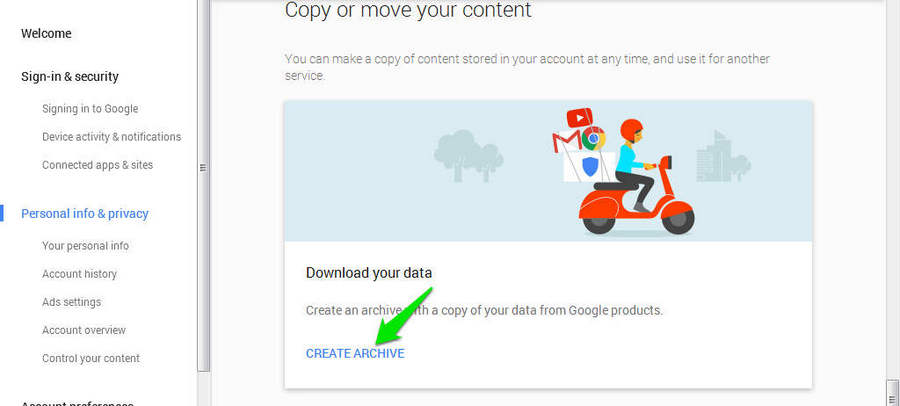
In My Account, click on “Control your content” located under the heading “Personal info and privacy”.

Here, you will see the option of “Download your data” with a “Create Archive” button below it, click on this button.
On the next page, you will see all the Services Google Account has to offer with a check mark next to it in green. This means if you will create archive now, all your data in the “checked” Google services will be downloaded.

Backing Up all this data is handy if we need to delete the specific Google Account, However, we only need Gmail data. So, we will uncheck all other services and check Gmail (it has Gmail icon with “Mail” written next to it) in the list. You can also backup other services data if you want, it will be saved in a separate folder.

Now, click on “Next” located at the top and you will be directed to change “File type” and “Delivery method”. If you don’t have anything special in mind, don’t change anything and just click on “Create archive” at the end.


You Archive will start preparing, it may take some time to create your archive depending on how much data you are backing up. For an average user, it should take less than 30 minutes, but it could possibly take several hours or even days.
When you will receive the email, just click on “Download Archive” button to download the file. It will be in the format you specified earlier (most probably in .Zip format). Just extract the file, and you will see “MBOX” file inside, which contains all your emails.
To view all your emails, you need to have a tool that will be able to open “MBOX” file. For this purpose, FreeViewer is a good tool. It is a desktop tool that will let you open “MBOX” files and then make them readable. It comes with both Free and Paid versions, but in our case, the free version is more than enough.
Restore Backed up Data
So you now know how to backup data and view it, but what about again restoring data? You might want to restore your data to the same Gmail account in the future or restore it to another account or even a different service.
Unfortunately, Google doesn’t offer any built-in feature to restore backup data. So we will have to depend on third-party programs and Email clients. In this tutorial, we are going to use the email client Mozilla Thunderbird. It is completely free to use email client and supports Windows, Mac and Linux as well.
Configure Gmail
We are going to restore backed up emails back to the same Gmail account first. For this purpose, we need to enable IMAP in Gmail so Thunderbird could connect.
Sign in to your Gmail account and click on the “Gear” icon located at the right side of the window. From the menu, click on “Settings”.

In Settings, click on “Forwarding and POP/IMAP” tab to see all the available options. Here select the option “Enable IMAP” located next to “IMAP Access”.

Now, go the bottom of the page and click on “Save Changes” to save all the changes.

Set up Email Account
Download Thunderbird from the official website and install it. After that, you will have to attach your Gmail account with Thunderbird. The client makes it very simple to attach your account and takes care of all hard work for you. When you will be asked to select between IMAP and POP, select IMAP and your account will set up.
Add “MBOX” file to ThunderBird Client
To add the “MBOX” (backup file) file download from Gmail to Thunderbird, you need to add it manually into the Thunderbird. The destination where you have to copy the “MBOX” file is below:
C: > users > UserName > AppData > Roaming > Thunderbird > Profiles > (random words).default > Mail > Local Folders
In the above directory, “UserName” is the name of the Windows account you are logged in with and “random words” are just random words before .default.
Go to the above mentioned directory and paste the “MBOX” file. Now restart the Thunderbird client again and you will see your “MBOX” file under“Local Folders” option located in the left panel menu. You can click on it to see all your backed up emails.


Restore Data to Gmail
Once “MBOX” file is loaded in Thunderbird, it is just drag and drop away to restore all your backed up data. All you need to do is select the emails which you would like to backup from the “MBOX” file and drag and drop it on your Gmail account’s “Inbox” option.

You can press and Hold Ctrl key and click on each email to highlight them to drag and drop or click on any file and then press Ctrl+A to select all of the emails.
Tip: To Drag and Drop, click and hold on the content which you would like to drag and move your mouse to drag it across the screen. When you will leave the click it will drop the file (if possible) in the area where it is currently hovering .
Before restoring emails to other services you need to make sure the email service supports “IMAP” and it is also enabled. Most of the popular service do support IMAP, just make sure it is enabled. If you can’t seem to find the option, check online if they support it or not.
You need to set up the new email account with Thunderbird as well like we set up Gmail at the start. To add the new email account, click on the main menu button located at the top left corner of the thunderbird window (it’s the three horizontal lines). In the menu, hover your mouse cursor over “New Message” and from the next menu, click on “Existing Mail Account…”


Now you will be again directed to the same Email setup page, which you can use to set up the new email following the instructions. When prompted to select IMAP or POP, click on IMAP just like you did above.
Once set up properly, just drag and drop the emails from “MBOX” file to the new attached email’s “Inbox” and they will be restored there.
If you have anything to share or need assistance with any of the above processes, let us know in the comments below and we would love to help.