These days thanks to plug and play technology, connecting an external hard drive to your computer is pretty easy and straightforward. All you need to do is plug it in, give it a couple of seconds, and it should be detected and show up in File Explorer. Unfortunately, sometimes it just won’t show, and it can be a bit alarming.
However, we have provided several steps below in this guide that will hopefully help you resolve any issues related to your external hard drive not being detected or showing up.
Check The Cables And Ports
The most straightforward thing you can do is to ensure that your cables and ports are working properly. If you plug in an external hard drive and it is not being detected, one of the reasons could be a faulty cable or a busted port. This can be easily resolved by swapping out the cable for another one and see if the problem persists.
You can also check the port by plugging in another device, such as a keyboard, mouse, microphone, or webcam, and seeing if your computer can detect it. If it can, then you know that the ports are working just fine, and that maybe you need to move to the next step.
Also, if you’re using a hub (which is a pretty popular accessory these days), then try unplugging the hub and plug the external hard drive directly to your computer’s USB port. This is because due to the fact that hubs handle multiple connections and peripherals, certain cheaper models might have compatibility or poor power management issues, where it can’t provide enough power to power the drive, thus leading it to not being detected.
Checking The External Hard Drive On A Different Computer
If there is a reason why SSDs are gaining in popularity, it is due to the fact that they do not contain any moving parts. This is unlike more traditional HDDs that still use spinning platters. Over time, wear and tear could cause the drive to stop functioning, meaning that your drive not being detected isn’t a software issue but a hardware issue.
If you have access to another computer, then try plugging in your external hard drive to that computer to see if it can be detected. If it can, then this means that there could be some software-related issues on the first computer. If it can’t be detected, then there is a possibility that maybe, just maybe, your hard drive itself could have some issues where the drive itself or the controller is dead.
Switching To A Supported File System
Due to there being multiple operating systems such as Windows, Mac, and Linux, there are times when your drive might be formatted in such a way that it exclusively supports one platform’s file system. For Windows users, the supported file systems include NTFS, FAT32, exFAT, or ReFS.
In order to get an external hard drive that has been formatted for Mac to work on Windows, you’ll need to format it to a supported file system. Unfortunately, this process usually involves wiping the drive entirely, so the best way to do this is to format it at the start before you start putting content on it. Also, formatting it in a file system that supports multiple platforms will also make life easier if you’re switching back and forth between Windows and Mac (check out our guide here on how to format a hard drive for Mac and how to format a hard drive for Windows).
- Open Start
- Search for “Create and format hard disk partitions”

- Right-click the drive you want to format and click “Format”

- Under “File System”, select “NTFS” if you plan to use it exclusively with Windows, or “exFAT” if you want to be able to use it together with Windows and Mac
- Click OK
Properly Configuring A Drive’s Partition
Sometimes when you connect a brand new external hard drive to your computer, it might not be detected because its partition is not properly configured. This can be easily resolved by following the steps below.
- Open Start
- Search for “Create and format hard disk partitions”
- If the drive doesn’t have a partition, it should show “Unallocated” space
- Right-click it and select “New Simple Volume” and follow the steps
- Select “Assign the following drive letter” option
- Click the dropdown menu and pick a letter of your choice
- Click Next
- Select “Format this volume with the following settings” and use the default settings
- Click Next
- Click Finish
Update Your Drivers
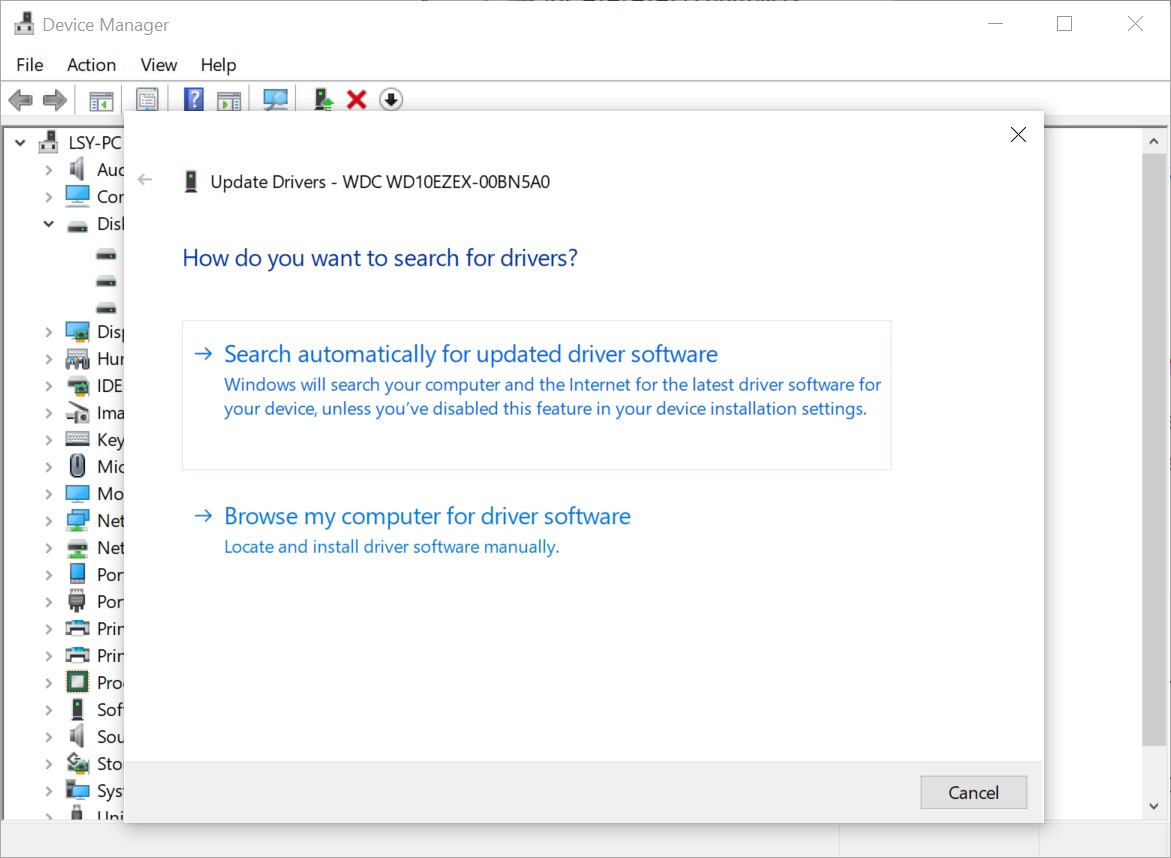
Sometimes when a drive isn’t detected, it could be due to the fact that your drivers could be out of date. Thankfully, updating your drivers is a quick and simple process and these are the steps you can follow to update your drivers (it is also applicable for other peripherals and hardware that is connected to your computer).
- Open Start
- Search for “Device manager”
- Under Disk drives, right-click the drive whose driver you want to update

- Select Update driver

- Select “Search automatically for updated driver software”
- Give it a minute or two to search for the drivers to install
Reinstalling Device Driver
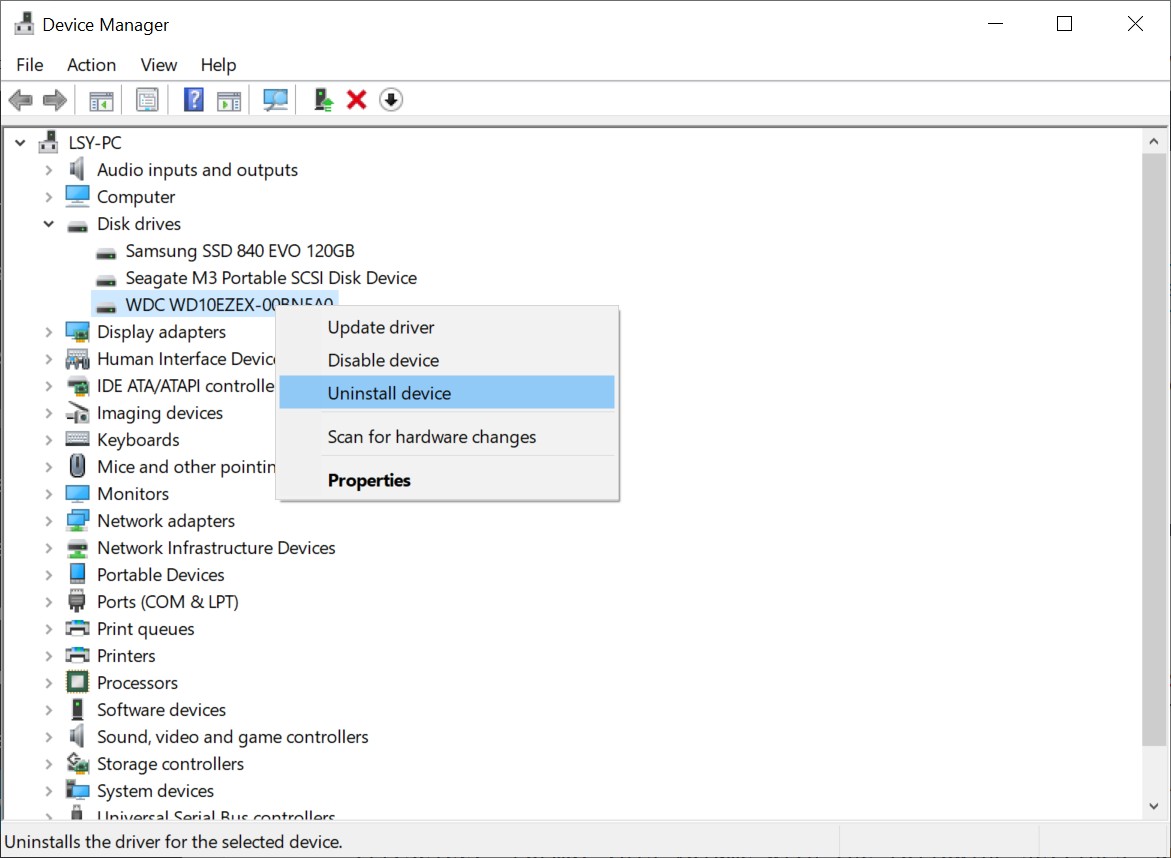
In the event that updating the drivers doesn’t work, or if there are no new drivers to be found, you can try reinstalling the device’s drivers to see if that helps.
- Open Start
- Search for “Device manager”
- Under Disk drives, right-click the drive whose driver you want to reinstall

- Select “Uninstall device”

- Click “Uninstall”
- Disconnect the external hard drive from your computer
- Restart your computer
- Reconnect the external hard drive, in which Windows should recognize it and reinstall the drivers again
Conclusion
If all of this fails and you’ve tried the steps mentioned above, then there is a chance that it could be due to hardware failure. If you have important documents and files stored on the drive, you can attempt to send it in for data recovery services and it might also be time to consider getting a new drive.
Filed in . Read more about Microsoft, Windows and Windows 10.


