Getting hooked on to your smartphone more than you should? Want a healthy schedule instead? If that is what you are looking for – the screen time management feature on iOS 12 will help you organize your digital life. With the Screen Time settings, you get to know your usage patterns (how much time you’ve spent using an application per day/week/month) or which of the services do you use the most.
Of course, your usage would vary – depending on what matters the most to you. But, in general, you get to analyze your smartphone usage behavior. And, you can take a break from using your smartphone. So, in this article, we will discuss the feature in details to help you get the most out of it.
Note: You need to have iOS 12 installed. If you still have iOS 11, go to the settings and upgrade it to the latest iOS version.
1. Setting it up

You can find the option in the settings menu itself. Just head there and tap on “Screen Time” and turn on the screen time feature. At the time of setup, it will let you know about the key highlights of it and would also ask you to clarify whether the device belongs to you or your kid.
If the device belongs to you, then you can proceed to tweak the feature. In either case, if it belongs to a kid, you will be immediately asked to set the downtime and app limit. We will get to know about those features below.
2. Set Screen Time Passcode
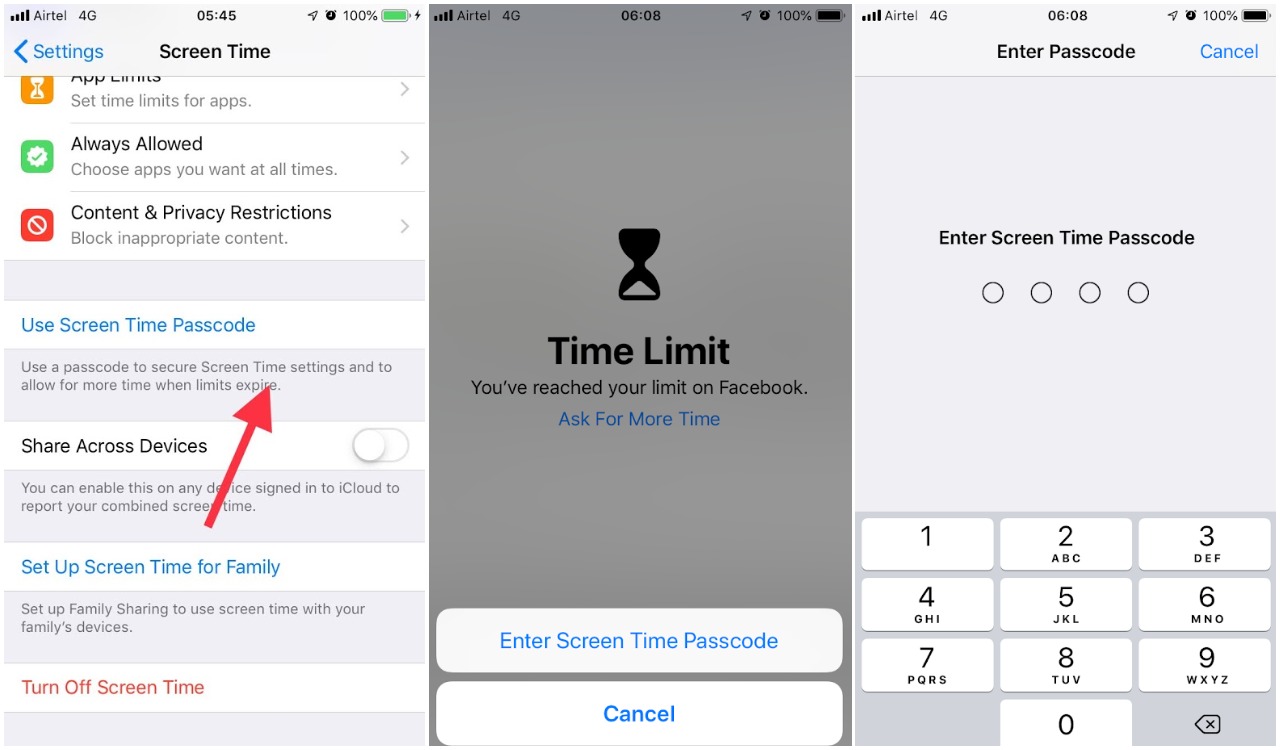
You do not want your settings to be fiddled with – so you should use a screen time passcode. So, without the passcode, you cannot change the Screen Time settings or bypass app limit time. I would definitely recommend you to set this one up – if you really want to keep yourself in check in order to waste time using the smartphone for no reason.
3. Set Up Screen Time for Family (optional)

If you want the reports of your family members (or your kid) – you can set up family sharing for the screen time feature by adding an Apple ID.
4. Sync Across Multiple Devices
As you can see in the image above, you have an option to “Share Across Devices“. So, if you have your account signed in to other devices with iCloud syncing – you can enable this to track your combined screen time.
5. Information on Screen Time

After you have successfully set up the screen time feature, it is time to analyze the usage pattern. As you can observe in the screenshots above, the data contains the average time spent per day (categorized) and per day as well. In addition to that, you also get to know how many times per day you have picked up your device and in total how many notifications you received.
Finally, you also get to know the individual screen time for particular apps. Accordingly, you can set the limit and downtime – which we will discuss below.
6. Setting Downtime

After setting up all the important settings, you can start setting limits. To start with, you can enable the Downtime to stay away from the screen – only the apps you will allow will be available. Technically, it acts as one of the “DND” features – which we have discussed about in our recent guide to use DND on iOS 12.
As shown in the image above, you can allow specific apps by heading to “Always allowed” to be available during the downtime.
7. Setting App Limits: App categories

You can set a custom time duration for apps to be available for – after which – you will not receive any notifications from that app and you will get the option to ignore the limit temporarily. By default, when you try to set “App Limits” – it automatically categorizes the apps installed and asks you the category of apps you want to enforce the limit.
It is usually handy to set an app limit by selecting the categories – but if you want some specific applications individually, you will find the solution below.
8. Setting App Limits: Selecting a specific app

You cannot select any random app to limit the screen time – it has to be one of the most used applications. When you take a look at the information about your screen time, you will also be able to observe the applications listed. So, tap on any of those apps and then you will find an option to set a limit for that particular app as shown in the image above.
9. Allow apps

After setting up the downtime and app limits, it is time to mark a few applications that are very important to you and should be ignored from the restrictions all the time.
As you can see in the image above, tap on “Always Allowed” option to take a look at the apps – just add the ones you want or remove the ones you don’t want.
10. Content & Privacy Restrictions

With the screen time feature, you can also put some content restrictions and enable/disable services that are important for your privacy. You can tweak what kind of web searches you want to allow, disable location services, and also be able to allow or restrict iTunes and App Stores purchases/downloads. Take a look at the screenshots above to know how it is done.
Wrapping Up
As per your preference, you should keep analyzing and tweaking the screen time feature to make the most out of it. Now, that you have known what it can help you do – what are your thoughts on this feature?