You are probably here because you already know that Apple does not allow screen recording apps on the App Store. However, Vdyo (a screen recorder app for iPhone) managed to slip past the App Store’s verification process and went live for a day which let users record their screen. Unfortunately, you are not going to get another screen recorder app anytime soon! So, in this article, we will guide you with alternative methods to record iPhone Screen.
Why Apple Does Not Allow Screen Recorder Apps on the App Store?
It is a misconception when someone claims that iOS does not support recording of your screen. It does. However, as an additional layer of security and privacy, Apple does not allow screen recorder apps on the App Store.
Apple would not bother you of Jailbreaking the device or sideloading an app, but it does pose a threat to your device’s security. In reality, if you allow a screen recorder app to function, the app can monitor your activity and (visually) record things you type. So, it is better not to have them installed even if you do come across an app on the app store that claims to do the work.
If Screen Recording Raises Security Concerns, Why Use It?
We do realize that screen recorder apps raise privacy concerns, but we also need to record our device’s screen for specific tasks. For instance, if you want to record your iPhone’s screen to show your friends how a game works. If you are a professional tech reviewer, you might find screen recording apps handy to help you make quick tutorials on a newly launched app or game. You can utilize the screen recording capability for such similar works which include both professional and experimental needs.
If no app does the work, how would you record your iPhone’s screen? Do you need to Jailbreak your device? Sideload an app?
Yes, you can do that. But, we would not recommend doing it that way. Instead, here, we have compiled a couple of software solutions which would help you record your iPhone’s screen through a computer without Jailbreaking the device or sideloading an app.
Note: Ensure that both iPhone and your computer are connected to the same network.
1. Record iPhone Screen Using QuickTime Player
QuickTime is a media player developed by Apple. It comes pre-installed with Mac OS. It is available to download for Windows OS as well. However, recently Apple has ceased support for Windows OS which had some serious security vulnerabilities (you can still download it though). So, if you are running a Windows-powered system, you need to have a previously purchased pro key to make QuickTime work with the complete set of features because you cannot buy a pro key for Windows anymore.
Steps To Record Your iPhone’s Screen Using QuickTime Player
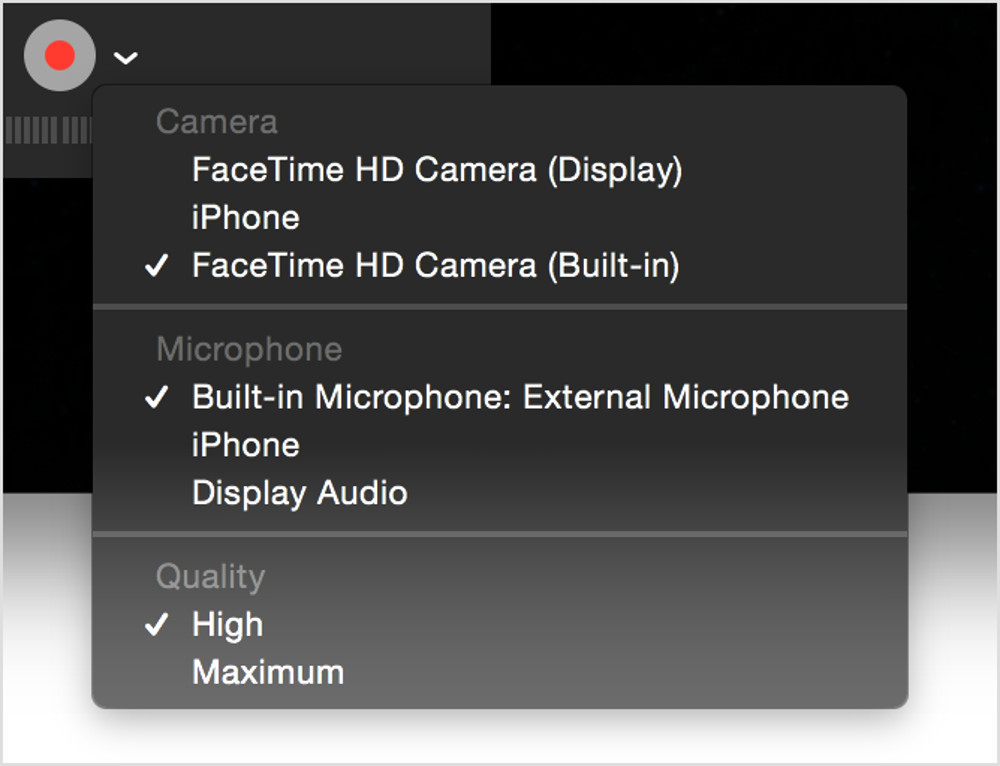
1. Click on “File” and hover through the options to select “New Movie Recording“.
2. To record your iPhone’s screen. Click on the arrow icon, next to the record button and then click on “iPhone“.
3. Now, click the Record button to start recording your iPhone’s screen.
2. Record iPhone Screen Using X-Mirage
X-Mirage is available for both Windows and Mac. After you download it and install it successfully, you need to follow the steps below to start recording your iPhone’s screen.
Steps To Record iPhone Screen Using X-Mirage

1. Swipe up from the bottom of the screen to bring out the control center.
2. Now, tap on “AirPlay Mirroring“. You will probably get a list of devices (if multiple nearby devices support AirPlay, and then select X-Mirage.
3. Finally, on your computer, hover the cursor over the Mirrored window to find the record button. Simply, click on it to get started. To stop recording, you need to click on it again.
3. Record iPhone Screen Using Reflector 2
Reflector 2 is yet another impressive software utility available for both Windows and Mac. Follow the steps mentioned below in order to record your iPhone’s screen.
Steps To Record Your iPhone’s Screen Using Reflector 2
1. After successfully installing Reflector 2 on your system, launch the program. Do note that it is not a free software but comes with a trial period of 7 days. So, if you want to continue using the product, you need to purchase it.
2.You will have to connect your device to your computer using AirPlay. If you still do not see your device listed on your computer system, you could take the help of additional on-screen instructions to connect your device with the computer using Reflector Detector app available on the App Store.
3. Similar to X-Mirage, you need to hover the cursor over the mirrored window to view the record button and then click on it to start recording.
4. To stop recording, you need to click on the record button another time.
4. Record iPhone Screen Using Apowersoft iOS Recorder
Apowersoft is yet another popular software utility available for Windows and Mac. Here’s what you need to do to record your iPhone’s screen.
Steps To Record Your iPhone’s Screen Using Apowersoft Screen Recorder

1. After successful installation on your system. You need to connect your iPhone to the computer using “AirPlay Mirror” option. You may refer to the image above to get an idea of what to connect to.
2. Now, launch the program on your computer and head on to click the record button to start recording.
5. Record iPhone Screen Using Dr.Fone
Dr.Fone is one of the greatest 3rd Party phone manager software available for both Windows and Mac. To record iPhone screen using it, follow the steps mentioned below.
Steps To Record Your iPhone’s Screen Using Dr.Fone
1. Once you launch the Dr. Fone program on your computer, you will observe a lot of tools listed. Among the available tools, you need to click on “iOS Screen Recorder“.
2. Now, perform mirroring of your iPhone’s screen using AirPlay.
3.After you can successfully see the mirrored window, click on the record button while hovering the cursor on the mirrored window.
Wrapping Up
So, finally, now you know about several solutions to help record your iPhone’s screen.
Did we miss any of your favorite software? Is any of the software mentioned above not working for you? Let us know your thoughts in the comments below.